I just made that up. It's actually pasta with pancetta and cream, but I just couldn't resist the rhyme :) But this is one of the easiest pasta dish around and you just can't go wrong with it. In 15 minutes, tops.
Pancetta, by the way, is a kind of Italian bacon that usually comes pre-cut into cubes. It's very salty and needs no further spicing up.
INGREDIENTS:
200g pancetta
500g Spaghetti or Spaghettini
1 cup table cream
Granulated garlic (to taste)
Cracked pepper (to taste)
STEPS:
1. Place pancetta on large non-stick wok/pan over low heat. Stir and cook until browned on the sides and scoop out excess bacon oil leaving only about 1-2 tablespoons of it.
2. Pour cream over cooked pancetta and simmer 2 minutes stirring occassionally. Season with granulated garlic and cracked pepper.
3. Cook pasta until al dente according to box instructions.
4. Strain pasta out of water and place directly on wok/pan with your pancetta and cream sauce. Mix and serve.
Tada!
Now don't forget your vegetables! You can make this dish a tad healthier by adding maybe some chopped broccoli, peas or maybe some chopped parseley, up to you.
Tuesday, April 23, 2013
DIY Frozen Food: Beef Pot Roast
This is one of my favorite Beef Pot Roast recipes and it's really quite easy to learn. The only downside is that the cooking time is very long so what you can do is prepare this in large quantities so you can put maybe 3-4 family-servings in the freezer at a time. Best done on a weekend, of course.
INGREDIENTS:
Stewing Beef
Garlic (3-4 cloves)
Onion (1 large)
Celery (1 stalk)
Ginger (1 2-inch piece)
Salt and pepper
Sauce (from Paula Deen's Pot Roast Recipe)
1 can Cream of Mushroom
2 T Worcestershire sauce
1/4 c. red wine
1 beef bouillon
1/2 c. water
STEPS:
1. Roughly chop garlic, onion, celery and ginger and lay on a baking pan lined with aluminum foil.
2. Season beef pieces with salt and pepper and lay over chopped spices.
3. Cover/wrap the meat completely with the foil and bake at 325F for 3 hours.
4. In a small sauce pan, combine and mix thoroughly all sauce ingredients and bring to boil.
5. When done, remove meat from oven and allow to rest. Remove meat from baking pan and combine with cooked sauce in a large mixing bowl. Allow to cool.
6. When completely cooled, place serving portions in small disposable baking trays.
These will keep in the freezer for a while. When ready to serve, just pop them in a preheated oven at 425 for 20-25 minutes. Serve with mashed potatoes and broccoli on the side.
Friday, April 19, 2013
Pot Luck Idea: Chicken Macaroni Salad
Looking for ideas for a pot luck party? How about Chicken Macaroni Salad? Well, yes, it's not quick and easy, there's lots of ingredients and stuff to do so this may take about 2 hours to make but the free time and the delicious salad (this particular recipe, anyway) you get after is so worth it. You can make it a day or two before so you won't have to cook on the day of the party. And so you won't have to take a shower mid-afternoon because your hair smells like you've been cooking right before. And, if not for a pot luck, it's also fabulous to keep on hand in your fridge. Make a snack or even lunch out of it.
I find that in most pot luck Filipino parties I go to -- although I haven't exactly been to a hundred -- people prefer to bring either their most complicated specialties (e.g. kare-kare, caldereta, lengua, etc) or their simplest: dessert (leche flan, buko pandan, or my favorite quick and easy choice: the fruit platter!) And not that I don't want to be outdone, I just don't like to be the one to bring the food that people barely touch on the buffet table and so I too like to bring something "special" as well, like this Chicken Macaroni Salad. I like to think that it's not overly complicated and I have received mildly flattering compliments each time I've made it hence I am sharing this recipe for non-cooks like myself.
I give full credit to my high school home economics teacher for this recipe. It's not the quickest food to prepare but it is simple enough for a non-cook to do (I learned it in highschool, after all).
INGREDIENTS:
2 Chicken breasts
3-4 cloves garlic
2 large onions
Salt and Pepper
3 stalks Celery
500g Elbow macaroni
1 green pepper
1 large carrot
1 can pineapple tidbits OR 1 cup of raisins
1/2 cup pickle relish
1 cup mayonnaise
1/2 cup vinaigrette (combine 1/4 c. white vinegar, 1/4 cup olive oil, 1 tsp each basil, oregano, salt and pepper)
1/2 cup evaporated milk
2-3 T sugar
STEPS: There are going to be 4 major processes you just need to keep in mind and I'll list the steps accordingly: 1) cooking the chicken breast, 2) prepping the pasta/macaroni, 3) prepping the veggies, 4) mixing the salad together.
IMPORTANT: You will need a very large bowl to mix the salad together.
1) Cooking the chicken breast:
- Place clean chicken breasts in small pot
- Add peeled and squished cloves of garlic, one onion peeled and halved, one celery stalk, about 1 tsp each salt and pepper.
- Add enough water to cover chicken
- Turn on medium heat and cook for about 30 minutes (or check for meat doneness)
- Remove chicken from pot and let cool
- Once cooled, shred or cut up the chicken breast finely. then set aside
2) Prepping the pasta/macaroni:
- Cook the macaroni according to box instructions to reach al dente. (note: Rinse cooked pasta with cold water as you would for cold pasta salads)
- Add vinaigrette to your cooked and rinsed macaroni and mix thoroughly, then refrigerate for about 30 minutes to allow the vinaigrette to cling to the pasta
- Add evaporated milk to the macaroni and refrigerate again for 30 minutes or until you're ready to combine all the ingredients together
3) Prepping the veggies:
- Mince 1 onion, 2 celery stalks and 1 green pepper and place in a large bowl.
- Peel carrot and grate carrot, then add to your minced veggies.
- Add pickle relish and pineapple tidbits or raisins to minced veggies and mix thoroughly.
4) Mix the salad together:
- Take your large bowl with your minced veggies, relish and pineapple.
- Add in your chicken and mix.
- Add in your macaroni and mix.
- Add your mayonnaise and mix thoroughly
- Add your sugar and mix thoroughly
- Taste the salad and adjust to fit your preference (don't skip this step! this is the part where I usually add a little bit more sugar and maybe some mayo if the macaroni looks too dry)
-
Saturday, March 2, 2013
DIY Frozen Food: Fall-Off-the-Bone BBQ Ribs
Now this is something that any non-cook should be able to do with the least amount of personal stress and effort as making guaranteed-delicious-and-tender bbq baby back ribs will allow.
I find that I truly enjoy the convenience of frozen food. I especially like barbeque baby back ribs, and so I do find my refrigerator stocked with store-bought ready-to-cook baby back ribs most of the time, until I (somehow) learned to make it myself!
INGREDIENTS:
Rack of pork side/baby back ribs
Garlic (roughly chopped)
Ginger (roughly chopped)
Onion (roughly chopped)
Salt
Pepper
Bbq/honey garlic Sauce (your choice of sauce like Heinz or Kraft)
STEPS:
1. Lay chopped garlic, ginger and onion on a sheet of aluminum foil big enough to wrap around your pork rack and set aside.
2. Rub your pork rack with salt and pepper all over.
3. Lay the seasoned pork over your chopped spices and wrap in the foil tightly.
4. Bake in preheated oven at 325F for two hours.
5. Remove from oven and foil to allow the meat to cool down, then slather the meat with your favorite barbeque sauce.
6. Wrap in cling wrap tightly then place in a ziploc. Pop it in the freezer and it should keep for a while, just like any frozen food.
Anytime you're ready to serve it, simply take it out of the freezer and unwrap, place it on a baking sheet and bake at 425F for 30 minutes. Best served with rice, baked potatoes or mashed potatoes and some blanched vegetables on the side.
Friday, March 1, 2013
A Decently Complete Brunch: The Humble Tuna Salad
I always feel some pressure to impress whenever I have company over at my house. Regardless of the fact that I only ever invite my closest or, at least, good friends who I know are understanding enough and are not wont to criticize my hosting skills at all, the pressure is always there, especially when it comes to the menu. One recent "discovery" I had, being your average "cook," was that you can actually serve a decently complete brunch with just the tuna salad as your main dish, and that there's a good chance that your guests will not be unimpressed. The main thing to note is that you do NOT serve your plain old tuna and mayo concoction, but rather use a recipe which gives your tuna a LOT of personality. But before that, here's how your impressive little brunch service would look like:
With your tuna salad nicely placed in a nice looking serving dish, you can serve your guests the following:
1. A nice green salad - serve some arugula, sliced tomatoes and sliced cucumbers so your guests can make bake their own.
2. Fried bread sandwich - brush some slices of two kinds of multi-grain bread with butter and fry on a non-stick pan for 2 minutes on each side. Serve this beside your green salad items for your guests' selection as well. This will take your tuna sandwich to a new level of deliciousness. That's just my opinion, but I really feel you should trust me on this ;-)
3. Canapes - lay out a tray of Ritz crackers and top with your tuna salad, garnish with a teeny sprig of cilantro.
Spruce up your brunch spread by adding a pitcher of Lemon-cucumber water on your beverage tray where you have some self-serve coffee and tea and voila! Easy peasy, don't you think? Now let's get back to your pièce de résistance, the tuna salad.
Ingredients:
Canned tuna, drained
Minced Onions (about 2 Tbsps for every can of tuna)
Minced Celery (about 2 Tbsps for every can of tuna)
Pickle relish (about 2 Tbsps for every can of tuna)
Melted butter (about 1 Tbsp for every can of tuna, melt in microwave)
Mayonnaise
Sugar
Salt
Pepper
Paprika
Steps:
1. Mix your onions, celery and relish together.
2. Add tuna flakes and mix thoroughly.
3. Pour and mix in melted butter, then mayonnaise. Mix completely.
4. Add salt, black pepper and sugar to taste.
5. Garnish with a dash of paprika on top.
The best part is you can prep most of these the night before, so you don't have to wake up extra early to get everything ready.
For the lemon-cucumber water, just put slices of one lemon, slices of half a cucumber, and a tablespoon of white sugar in a glass pitcher. Fill it three quarters with cold water and let sit in the refrigerator overnight. Add tons of ice when ready to serve.
Thursday, April 26, 2012
Lechon in the Oven, Cebu Style
I never thought it would be possible to make Lechon in an oven but it was. Real crunchy, authentic-tasting Cebu-style Lechon. In an oven. Yes. Lechon de Cebu right here in Canada! :)
If you want to impress your Filipino-Canadian guests on Thanksgiving or on Christmas Eve, this is definitely one way to do it. I've made it several times now and the key to making it Cebu-style, in my opinion, is to make it extra salty and to completely remove that "baboy-smell" with tons of garlic, onion, ginger and, my non-cook secret, celery. And to make the skin crunchy (not the bubbly chicharon skin crunchy, but real thin lechon skin crunchy), keep heat low (extend cooking time until you can feel that the skin is thin and tough enough by tapping it with a fork or knife), baste with oil every 15 minutes then raise the temperature for the last 30 minutes.

INGREDIENTS:
1 whole slab pork belly (like the one in the picture above)
Silver Swan soy sauce
Black Pepper
Salt (lots)
Lemon grass
1 large onion
1 head garlic
1 celery stalk
Small piece of ginger
1 bunch green onions
STEPS:
(Note: baking time is about 3-4 hours)
1. Rub salt and black pepper generously all over the meat. Set aside.
2. Cut up onion, garlic, ginger and celery and place in aluminum roaster pan or baking pan.
3. Add lemon grass and chopped (about 2-3 inch pieces) green onions.
4. Place seasoned meat on top of spices, skin side up.
5. Brush skin with soy sauce.
6. Cover and allow to marinate in the fridge for a few hours, or overnight even.
7. When ready, uncover baking dish and brush skin with more soy sauce.
8. Place the baking dish uncovered into oven pre-heated at 325F to cook for the next 3 to 3 and a half hours. Baste with soy sauce every 15 minutes until the desired redness is achieved, then baste with oil the rest of the way.
9. At 3 and a half hours, raise oven temperature to 425F and bake some more for about 30 minutes, but discontinue basting.
10. Remove from oven and allow to rest.
Good luck!
Monday, March 12, 2012
The Perfect Leche Flan
I do believe that the Leche Flan (aka Creme Caramel) is a party staple for Filipino gatherings -- if you're invited to a party hosted by Filipinos, there's a good chance there'll be Leche Flan for dessert. But while it's something I would look forward to in such events, I've had all sorts of Leche Flan to have had some that did disappoint -- some too sweet, too rich, or too pale. Sometimes you can even distinguish the ingredient that makes it bad -- too much sugar, too much egg white, cheap milk, etc... And, of course, there are some that taste just perfect.
I have tried many times to make Leche Flan on my own, but I've always had little success, amateur cook that I am. But this recipe, perfected courtesy of my dear sister, is fool-proof for the non-cook. Easy peasy for something sure to impress: a Leche Flan that's just right -- sweet but not too sweet, creamy but not too creamy.
INGREDIENTS:
6 egg yolks
1 whole egg
1 can condensed milk
1 can evaporated milk
whole milk (measure half the can of evap)
1/2 teaspoon vanilla
1 cup sugar for caramel
STEPS:
1. Place sugar in small saucepan on medium heat. Add a little bit of water along the edges of the sugar. Bring to a boil, shaking the pan occassionally. Do not stir with spoon/ladle. Once sugar turns golden brown, take off from heat and pour into flan molds/baking tins immediately. Set aside to cool and harden.
2. Prepare 6 egg yolks and one egg in a bowl. Whisk lightly.
3. Add condensed milk and mix thoroughly.
4. Add evaporated milk, then whole milk and mix some more.
5. Add about half a teaspoon of good quality vanilla and mix.
6. Pour over hardened caramel in your flan baking tins and cover with the matching lid or you can just use plain aluminum foil.
7. Place the baking tins into a baking pan. Fill baking pan with water halfway up the height of the tins.
8. Place in oven at 350 for 50 minutes.
9. Take out from oven and allow to cool before inverting flans into serving dishes.
10. Refrigerate for about 2 hours before serving -- or eating ;-)
Friday, November 25, 2011
Walnut and Raisins Green Salad
Taking inspiration from Cyma's famous Roka Salata I made this budget friendly alternative. Cultured palates may not give any notice to this, but the few regular folk that I've served this to a few times always gave it praise so I think this deserves to be shared.
INGREDIENTS:
Balsamic vinaigrette (balsamic vinegar, olive oil, black pepper, dried basil and dried oregano)
Romaine lettuce
Parmesan cheese (block, not ground)
Raisins
Walnuts
Brown sugar
1. Vinaigrette: Combine equal parts of olive oil and balsamic vinegar. About 1/4 cup each should be enough, otherwise you can just add more. Add about a teaspoon each of ground black pepper, basil and oregano. Set aside.
2. Place about a cup of walnuts on nonstick pan over medium heat and toast lightly. Sprinkle brown sugar and stir constantly until sugar melts and sticks to the walnuts (Warning: take care not to burn the sugar). Remove from heat and set aside.
3. Cut up cleaned/washed Romaine lettuce into bite sized pieces and place a large salad bowl.
4. Add some of the raisins and candied walnuts into the lettuce and toss with prepared vinaigrette.
5. Sprinkle remaining raisins and walnuts on top of the salad.
6. Shave Parmesan cheese onto the salad using a vegetable peeler.
All done!
Tuesday, November 1, 2011
Burrito Casserole
I wasn't always a fan of burritos, but this was really good. I'm now a fan of this burrito.
INGREDIENTS
Lean ground beef
1 packet taco seasoning
Refried beans
1 large can diced tomatoes
Sour cream
Campbell's cream of mushroom
Jalapenos
Shredded cheddar cheese
Burrito tortillas
STEPS
1. Sautee ground beef in cooking oil until meat is lightly cooked (raw areas are gone)
2. Add taco seasoning and continue cooking.
3. Add refried beans and diced tomatoes and simmer for about a minute then take off from the heat.
4. In separate bowl, combine equal parts of sour cream and cream of mushroom. Mix well.
5. In baking dish, layer the meat sauce, cream of mushroom, shredded cheese and burrito tortillas -- just like the way you would with a lasagna.
6. Bake for 45 minutes at 350F.
Serve with more sour cream and some jalapenos on the side.
Friday, September 2, 2011
Chicken a la King a la French Baker
The taste that I had in mind for this dish was that from the French Baker in SM City and I think mine came out pretty close, except that I didn't have the puff pastry to serve it with. It was still good anyway so it looks like I'll be making this again in the future.


INGREDIENTS and PREPARATION
Chicken breasts, cubed
Garlic, chopped
Onion, chopped
Carrots, peeled and cubed
Potatoes, peeled and cubed
Edemame seeds (could not find peas in my fridge)
Salt and Pepper
Bay leaf
Butter
All-purpose flour
Chicken broth cube dissolved in about 3 cups water
STEPS
1. Season chicken with S&P.
2. Sautee garlic in high heat with olive oil.
3. Add the chicken and bay leaf and continue sauteeing until surfaces of all chicken pieces are cooked.
4. Stir in the onions, carrot, potatoes and peas/edemame. Cover and simmer for about 10 minutes at low heat.
5. In a separate pot, melt butter at low heat. Stir in the flour with a wire whisk and cook for about a minute (Proportion of flour should be about 75% butter to 1 whole flour). Pour in broth and stir to make a semi-translucent sauce.
6. Pour butter sauce into the chicken and simmer for about 5 minutes.
Pretty good! ;-)
Friday, August 26, 2011
Shrimp Cocktail
Another shrimp recipe. Just goes to show how much I love shrimp! This is an appetizer but I had it for an afternoon snack (teehee).
INGREDIENTS
Frozen peeled shrimp (pre-cooked, with tails on)
Ketchup
Lemon
Dill (fresh or frozen cubes will do nicely)
S&P
STEPS
1. Combine about a quarter cup of ketchup with two teaspoons chopped dill or 2 frozen cubes.
2. Squeeze in about half a lemon and season with salt and pepper to taste.
3. Serve with thawed shrimp.
Enjoy!
Thursday, August 25, 2011
Basa Fillet in Butter and Garlic
This is what I made today, inspired by what I could only find in the fridge. Quick and simple yet very tasty.
Basa Fish Fillets
Butter
Olive oil
Garlic
Salt and Pepper
Lemon
STEPS
1. Preheat oven to 375F.
2. Combine melted butter, olive oil and minced garlic in a bowl and season with S&P.
3. Grease a baking sheet lined with tin foil with some of this mixture.
4. Lay out fish fillets onto the greased and lined baking sheet.
5. Brush butter mixture generously over the fillets.
6. Place in oven and bake.
7. After 10 minutes, place a few thin slices of lemon into each fillet and continue to bake for 10 more minutes.
Serve with steamed rice and some blanched green vegetables like broccoli.
Monday, August 22, 2011
Baked Rosemary Chicken
This one is very quick and easy. I had Italianni's Rosemary Chicken in mind when I made this.
INGREDIENTS
Chicken (breast or thigh, with skin)
Rosemary
Salt and Pepper
Olive oil
Herbs de Provence
STEPS
1. Preheat oven to 400F.
2. Rub salt, pepper and rosemary on all chicken pieces thoroughly.
3. Lay out the meat in greased (with olive oil) baking sheet.
4. Brush olive oil on all pieces.
5. Sprinkle some herbs de provence on the chicken.
6. Place in oven and bake for 30 minutes.
A trick that I use to make sure that chicken thighs are cooked through completely and not have any bloody sections is to cut through the meat along the bones to expose them. Always works for me.
Serve with some fragrant rice and grilled zucchini.
Friday, August 12, 2011
Baked Hoisin Salmon
This is one of those dishes that I put together by taking only parts of some recipes that I like and adding it to some meat or fish that I prefer at the moment. Specifically, this is inspired by the dressing in California Pizza Kitchen's oriental chicken salad. It's very easy to prepare and something that you would not be shy about serving at a dinner party.
INGREDIENTS
Salmon fillet
Hoisin sauce
Soy sauce
Olive oil
Sesame oil
Chili sauce
Ginger
Cilantro
Basil
STEPS
1. Pre-heat oven to 400F.
2. Prepare about a cup of hoisin and add a splash of soy sauce, a couple of tablespoons of olive oil, a tablespoon of sesame oil and some chili sauce to taste. Add some grated ginger and mix together.
3. Pour the hoisin mixture onto salmon fillet laid out in a lightly oiled baking sheet.
4. Bake for about 30 minutes or test salmon for doneness.
5. Serve with chopped cilantro and basil on top.
The cilantro and basil complements the flavor of the hoisin and salmon tremendously. Adding these to the dish takes it out of the ordinary, so I really think this shouldn't be omitted.
Thursday, August 11, 2011
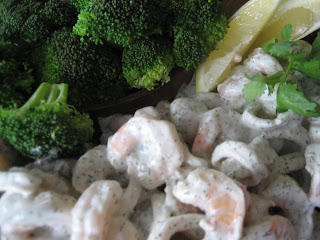
Seafood Salad by Scrumpdillyicious
Scrumpdillyicious: Seafood Salad with Celeriac Remoulade: "A lovely light salad to make during the warm summer months is an easy poached seafood salad made with large shrimp, scallops, squid and ..."
Now this is what I call seafood salad and it's as good as it sounds. I tried out this recipe from Scrumpdillyicious but without the remoulade (couldn't find any celeriac and I thought the sourcream dressing didn't really need to be paired with more mayo) and just added some blanched broccoli -- for garnish and/or as token vegetable :-) It was indeed scrumptious and dillyicious.
INGREDIENTS
Shrimp (large/medium)
Scallops
Squid
Salad shrimp (small)
Capers
Lemon dill sauce:Sour cream
Lemon
Frozen dill
salt & pepper
STEPS:
1. Blanch the shrimp, scallops and squid separately for about a minute and a half each in simmering water. Set aside in a paper towel to remove any liquid.
2. Prepare the lemon dill sauce by combining about half a tub of sour cream, half a lemon squeezed, about 8 cubes of frozen dill and salt and pepper to taste.
3. Toss the blanched seafood into the dill sauce.
4. Chill before serving
Now this is what I call seafood salad and it's as good as it sounds. I tried out this recipe from Scrumpdillyicious but without the remoulade (couldn't find any celeriac and I thought the sourcream dressing didn't really need to be paired with more mayo) and just added some blanched broccoli -- for garnish and/or as token vegetable :-) It was indeed scrumptious and dillyicious.

INGREDIENTS
Shrimp (large/medium)
Scallops
Squid
Salad shrimp (small)
Capers
Lemon dill sauce:Sour cream
Lemon
Frozen dill
salt & pepper
STEPS:
1. Blanch the shrimp, scallops and squid separately for about a minute and a half each in simmering water. Set aside in a paper towel to remove any liquid.
2. Prepare the lemon dill sauce by combining about half a tub of sour cream, half a lemon squeezed, about 8 cubes of frozen dill and salt and pepper to taste.
3. Toss the blanched seafood into the dill sauce.
4. Chill before serving
Wednesday, August 10, 2011
Chicken a la Buffalo
This is my attempt at satisfying a craving for Don Henrico's Buffalo Chicken Wings. It's a teeny bit close but not all there. There are a couple of spices that I can't identify from their recipe so this is the best that I could get. I think the key is making sure that each bit contains the right amount of the chicken, the barbecue sauce and then the dipping sauce. Modesty aside, it's almost as satisfying as the original.
 (Note: photo was taken after everyone got a piece, pardon the presentation please :))
INGREDIENTS
Barbecue sauce:
Honey
Ketchup
Soy Sauce
Garlic powder
Nutmeg
I also put in a bit of onion powder and ginger powder but I think they could just be eliminated from the list.
Chicken + marinade:
Chicken pieces (wings, thigh or breast -- with skin!)
All-purpose flour
Olive oil
S&P
Garlic powder
Onion powder
Ginger powder
Dipping sauce:
Plain yogurt
Mayonnaise
Cream cheese
Garlic
S&P
DIRECTIONS:
1. Prepare sauces and set aside
Barbecue sauce: combine equal parts of honey and ketchup and add soy sauce just enough to achieve the color desired. Add lots of garlic powder and powdered nutmeg to taste.
Dipping sauce: combine 2 parts yogurt with 1 part mayo and 1 part cream cheese and then add your garlic and S&P to taste.
2. Prepare the chicken by rinsing the pieces and patting them dry with a paper towel.
3. Season the chicken with salt and pepper.
4. Combine some garlic powder, onion powder and ginger powder (ratio is about 2:1:1).
5. Sprinkle about half of the powdered spices onto the chicken. Add some of your barbecue sauce to this marinade.
6. Combine the rest of the powdered spices with all-purpose flour to use for coating the chicken.
7. Dip each chicken piece into the flour mix and coat them well.
8. Place each chicken piece into a lightly oiled baking pan and set aside for about an hour.
9. Preheat oven to 400F.
10. When ready, brush each chicken piece with olive oil and place the chicken into the oven.
11. Bake for 30 minutes, after which brush some barbecue sauce onto the chicken and then bake for another 20-25 minutes.
12. Brush more barbecue sauce onto the chicken after taking it out of the oven.
Serve with the dipping sauce. Doesn't even need rice to go with it.
Wednesday, August 3, 2011
Spaghettini with Shrimp in Crab Paste
I made this today. I used this recipe for Gambas Al Ajillo with Crab Paste and just tossed it into some pasta. It turned out pretty well. Mm-uhmmm!
INGREDIENTS
Garlic
Olive Oil
Chili Flakes
Semi-cooked Frozen Shrimp (thaw and season with S&P plus a squeeze of lemon)
Crab Paste
STEPS
1. Saute chopped garlic in olive oil in high heat.
2. Add chili flakes and cook for about a minute.
3. Stir in the crab paste and cook for about a minute.
4. Add the shrimp just enough that it doesn't shrink.
5. Turn off heat and quickly toss in cooked spaghettini.
I served this with a tomato, basil and cheese appetizer that I saw from scrumdillyicious. It was a good combo but I wouldn't say it was great. Since the pasta was very savory, I think a blander appetizer would have worked better with it. Perhaps a simple cucumber, tomato and egg salad? Maybe next time.
INGREDIENTS
Garlic
Olive Oil
Chili Flakes
Semi-cooked Frozen Shrimp (thaw and season with S&P plus a squeeze of lemon)
Crab Paste
Spaghettini noodles (cook as directed in packet)
STEPS
1. Saute chopped garlic in olive oil in high heat.
2. Add chili flakes and cook for about a minute.
3. Stir in the crab paste and cook for about a minute.
4. Add the shrimp just enough that it doesn't shrink.
5. Turn off heat and quickly toss in cooked spaghettini.
I served this with a tomato, basil and cheese appetizer that I saw from scrumdillyicious. It was a good combo but I wouldn't say it was great. Since the pasta was very savory, I think a blander appetizer would have worked better with it. Perhaps a simple cucumber, tomato and egg salad? Maybe next time.
Tuesday, August 2, 2011
Humba Bisaya (dark, sweet and sticky pork stew)
Humba is one of my favorite foods. I can never grow tired of it. Luckily for me, my mom has several humba recipes and I think she makes one of the best that I've ever tried. This one is my favorite type of humba: dark, sweet and sticky. It does take me 2-3 hours to make it but it is very very easy.
A warning: this is not the healthiest food option.
INGREDIENTS
Garlic
Onion
Celery
Pork (combination of Belly, Knuckles and/or Tail), cut into large cubes/pieces
Silver Swan Soy Sauce
Muscovado Sugar
A can of Coca cola
STEPS
1. Place cleaned pork pieces in a large stewing pot.
2. In a cup, combine equal parts of the soy sauce and the sugar (about a quarter of a cup each for every pound of meat) then pour over meat in the pot. Mix to coat all pieces.
3. Add peeled and smashed garlic, peppercorns, star anise and bay leaf into the meat ans mix.
4. Place peeled and halved onion and celery stalk over the meat. Cover pot and place on low heat and let cook for about one hour stirring once or twice in between.
5. Add one can of coke to the stew and stir.
7. Continue cooking on low heat heat until meat is tender and the liquid is reduced to a sticky sauce, about 1 and a half to 2 hours more, stirring every 15-20 minutes.
Best served with steamed white rice and balanced with some steamed green veggies.
Note: As leftover, this dish gets better each time you re-heat or put in the microwave so for best immediate results, allow the dish to sit for an hour or so after cooking and just warm it up again before serving.
A warning: this is not the healthiest food option.
INGREDIENTS
Garlic
Onion
Celery
Black Peppercorns
Star Anise
Bay LeafPork (combination of Belly, Knuckles and/or Tail), cut into large cubes/pieces
Silver Swan Soy Sauce
Muscovado Sugar
A can of Coca cola
STEPS
1. Place cleaned pork pieces in a large stewing pot.
2. In a cup, combine equal parts of the soy sauce and the sugar (about a quarter of a cup each for every pound of meat) then pour over meat in the pot. Mix to coat all pieces.
3. Add peeled and smashed garlic, peppercorns, star anise and bay leaf into the meat ans mix.
4. Place peeled and halved onion and celery stalk over the meat. Cover pot and place on low heat and let cook for about one hour stirring once or twice in between.
5. Add one can of coke to the stew and stir.
7. Continue cooking on low heat heat until meat is tender and the liquid is reduced to a sticky sauce, about 1 and a half to 2 hours more, stirring every 15-20 minutes.
Best served with steamed white rice and balanced with some steamed green veggies.
Note: As leftover, this dish gets better each time you re-heat or put in the microwave so for best immediate results, allow the dish to sit for an hour or so after cooking and just warm it up again before serving.
Friday, July 29, 2011
Mediterranean Beef Stew
This is my take on Cafe Mediterranean's Lamb Stew. I haven't had it for a long time but I remember really loving it and have since searched high and low, but in vain, for that recipe. The ingredients that I used below are based on what I can remember of the taste and smell of that dish, so I may have gone overboard (or maybe fallen short) with the marinade. Anyhow, I made this dish once on the fly and was extremely surprised (yes, surprised) by how good it was :) It was a huge hit with my family they demanded that I make it again with lamb which I did and it was an even bigger success. Enjoy!
INGREDIENTS
Marinade (combine all in equal amounts)
Cumin
Ground Coriander
Turmeric
Ground Cinnamon
Curry
Ground Pepper
Bay Leaves
Cloves
Stew
Beef ribs (can substitute with Lamb shoulder pieces)
Diced/Crushed Tomatoes (can substitute with tomato sauce)
Pepper Corns
Beef Broth (beef cubes + water)
Carrots
Potatoes
Garlic
Onions
Salt
Sugar
Chili Flakes
STEPS
1. Marinate Beef overnight.
2. To start cooking, saute garlic and onions together in olive oil for about 45 seconds to 1 minute in high heat.
3. Add meat and brown it without cooking through.
4. Add peppercorns and continue sauteeing.
5. Add the diced tomatoes and stir to coat the meat.
6. Add the beef broth and let simmer for about 25 minutes or until broth reduces halfway
7. Add some salt, sugar and chili flakes to fit your taste.
7. Add the potatoes and carrots.
8. Test potatoes/carrots for doneness and remove from flame.
Subscribe to:
Posts (Atom)